software architecture pattern

Microservice architecture is an approach to software development that involves breaking down a large, monolithic application into smaller, independent services that can be developed, deployed, and scaled independently. Each microservice performs a specific function and communicates with other microservices using well-defined APIs.

microservice 
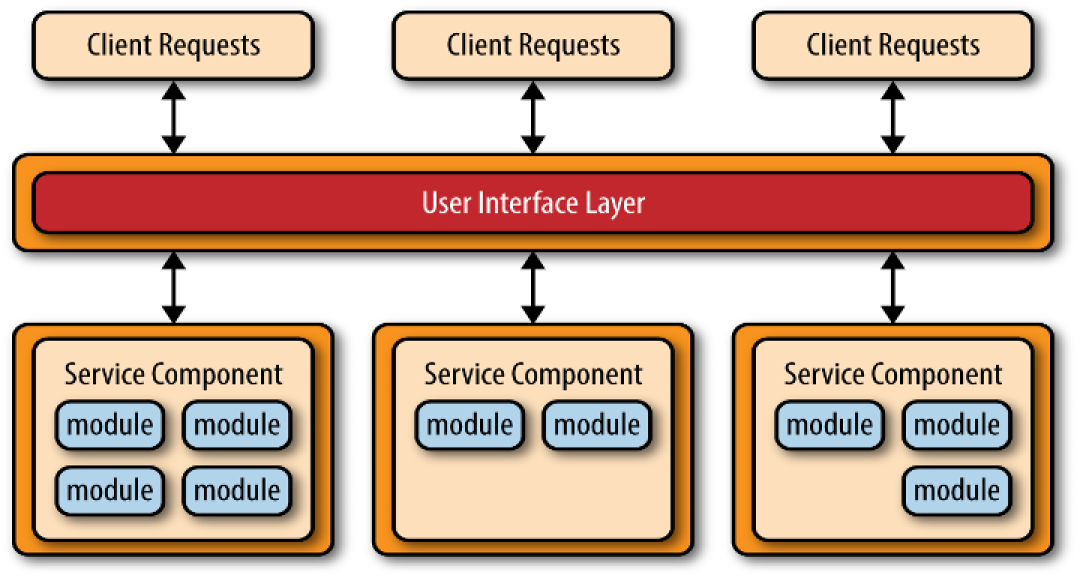
Image from redhat.com.

AWS uses a microservices architecture to build cloud-based applications. This architecture pattern enables AWS to break down complex applications into smaller, more manageable services, which can be easily scaled and deployed independently.

Building Microservice in AWS

Here we are going to create a basic microservice api that read, create and update data in database table. Firstly we create database table using Amazon DynamoDB. Then we create business logic for the application with lambda fuction using Amazon Lambda. At last, we create API using Amazon API Gateway.

How it works?
  • Amazon API Gateway hosts RESTful HTTP requests and responses to customers. In this scenario, API Gateway provides built-in authorization, throttling, security, fault tolerance, request/response mapping, and performance optimizations.
  • Clients send request to our microservices by making HTTP API calls.
  • AWS Lambda contains the business logic to process incoming API calls and leverage DynamoDB as a persistent storage.
  • Amazon DynamoDB persistently stores microservices data and scales based on demand. Since microservices are often designed to do one thing well, a schemaless NoSQL data store is regularly incorporated.

So When we invoke our API Gateway API, API Gateway routes the request to your Lambda function. The Lambda function interacts with DynamoDB, and returns a response to API Gateway. API Gateway then returns a response to us.
You can use AWS free tier account to perform following steps.

Data Storage

For setting up DynamoDB for the application follow the guide on Setting Up DynamoDB by AWS.

To create a table in DynamoDB, sign in to the aws management console.

  • In the dashboard of the console choose Create Table.
  • Enter table details here. For table name enter Student.
  • For partition key, enter id.
  • Leave Default Setting selected and choose Create to create the table.

For detail guide on how to create database table in DynamoDB, follow the given link.

Business logic

We will use AWS Lambda to create business logic or lambda function for the application. This lambda function create, reads, update and delete items in DynamoDB. The function uses events from API Gateway to determine how to interact with DynamoDB.

To create lambda function:

  • In the dashboard of the console choose Create Function.
  • Choose Author from scratch.
  • For Name, enter studentFunction as lambda function name.
  • For Execution role, choose Create a new role from AWS policy templates.
  • For Role Name, enter studentRole.
  • For Policy templates, choose Simple microservice permissions.
  • Choose Create function.
  • In the Configure function pane, under Function code copy the following code and paste it in the inline code editor.
  •                                         
                                const AWS = require(“aws-sdk”);
                                const dynamo = new AWS.DynamoDB.DocumentClient();
                                exports.handler = async (event, context) => {
                                    let body;
                                    let statusCode = 200;
                                    const headers = {
                                    “Content-Type”: “application/json”
                                };
                                try {
                                    switch (event.httpMethod) {
                                        case “DELETE”:
                                            await dynamo
                                            .delete({
                                                TableName: “Student”,
                                                Key: {
                                                    id: event.pathParameters.id
                                                }
                                            })
                                            .promise();
                                            body = `Deleted student ${event.pathParameters.id}`;
                                            break;
    
                                        case “GET”:
                                            if (event.pathParameters != null) {
                                                body = await dynamo
                                                .get({
                                                    TableName: “Student”,
                                                    Key: {
                                                        id: event.pathParameters.id
                                                    }
                                                })
                                                .promise();
                                            } else {
                                                body = await dynamo.scan({ TableName: “Student” }).promise();
                                            }
                                            break;
    
                                        case “POST”:
                                            let requestJSON = JSON.parse(event.body);
                                            await dynamo
                                            .put({
                                                TableName: “Student”,
                                                Item: {
                                                    id: requestJSON.id,
                                                    name: requestJSON.name,
                                                }
                                            })
                                            .promise();
                                            body = `Added/Updated student ${requestJSON.id}`;
                                            break;
                                        default:
                                            throw new Error(`Unsupported route: “${event.httpMethod}”`);
                                    }
                                } catch (err) {
                                    statusCode = 400;
                                    body = err.message;
                                } finally {
                                    body = JSON.stringify(body);
                                }
                                return {
                                    statusCode,
                                    body,
                                    headers
                                };
                                };
                                            
                                        
  • Choose Deploy.

The handler method is the method that will be executed when the lambda function is invoked. This function takes in two objects, event, and context. The event object contains all of the data sent from the event source and the context object provides several methods that allow you to interact with runtime information specific to that lambda function.

By using the event.httpMethod to differentiate the HTTP request, we can perform the create/update/delete and retrieve data from DynamoDB.

You can go through this link for detail information about creating, invoking, view logs and metrics.

API Gateway

All the requests and responses are handle through API. So, we create REST API in API Gateway. When the application receive HTTP request, API Gateway invokes the lambda function.

To create API in API Gateway:

  • Sign in to the API Gateway console at https://console.aws.amazon.com/apigateway.
  • Choose Create API. Under REST API, choose Build.
  • Choose New Api, and enter API Name as studentAPI and set Endpoint Type to Regional.
  • Choose Create API.
  • Under Resources, from the Actions menu, choose Create Resource.
  • Enter Resource Name as student.
  • Click on Create Resource.
  • In the Resources list, select /student.
  • In the Actions menu, choose Create Method.
  • Select POST to insert a new record.
  • Set Integration Type to Lambda Function.
  • Choose Use Lambda Proxy integration.
  • Choose Lambda Function to studentFunction.
  • Click the Save button, a message with Add Permission to Lambda Function will pop out, click OK to grant the permission.

For API GET by id and DELETE by id, we need to create another resource to specify path parameters.

  • In the Resources list, select /student.
  • In the Actions menu, choose Create Resource.
  • Replace Resource Path with {id}.
  • Click on Create Resource.
  • Repeat the Create Method steps to create GET and DELETE methods.

To deploy the created API:

  • Choose Deploy API from the Actions dropdown menu.
  • Choose Deploy. Note the API's Invoke URL.

Now you can test the API with the help of Postman.

For detail information about creating APIs in API Gateway, you can follow this link.